In this article, I will share my experience of enhancing a poorly looking image of a photorealistic kind using Krita AI Diffusion plugin and HR Beautify, a Comfy workflow I developed to complement the plugin with certain image-enhancing features, targeting high (and very high) resolutions. Here’s at-a-glance summary:
- Analysis of the impressive SILIVI v2 upscale method (what most people may have overlooked)
- AI-assisted image enhancing: the bare bones approach (what is usually done in upscaling and what is really essential, in my view)
- The methods I used: listing of the parameters for Krita AI and HR Beautify workflow used to enhance the 800×800 image, with UI screenshots
- The upscale tools comparison matrix: a side-by-side table displaying image versions enhanced by various open source local generation tools, incl. Forge, Krita AI, Flux etc., vs commercial ones, such as SUPIR, Magnific, Leonardo etc.
- Pushing the limits: the grotesquely degraded 2400×2400 test picture, restored to a new found glory (a stress test I performed for my methods – you will be the judge which result by which tool is the best)
- The proposed upscale & refinement routine, in 7 basic steps (the AI upscale essentials and experiments you should try, if you want the best result quality)
The test image
The image in question is a picture that was used to demonstrate the capabilities of an advanced image upscale method called SILIVI (v2), in an article on CivitAI posted about a year ago by the author, Veruky. I thought I could use the image to demonstrate improvements on his method and continue the discussion, in hopes that he won’t mind.
The 800×800 test image to be enhanced is displayed below (as taken from the Veruky’s article page). It appears to have undergone some sort of visual quality degradation, like a heavy jpeg compression:

(If feeling impatient, you can skip my analysis of Veruky’s enhancement method that follows and proceed right to the new method description above the Krita AI screenshot.)
Analysis of the SILIVI v2 method
Judging by the comments, the posting on SILVI v2 has left many people impressed, particularly by the fine detail in the enhanced image and the overall realistic look (see it in the comparison matrix below among the others). However, the method introduced by Veruky posed a number of issues, in my view:
- the enhancement routine that relied on no less than three specific Controlnets using a fixed set of parameters of narrow value range was quite rigid; I found it not working that great for other types of images or resolutions;
- the 3 Controlnets imposed high demands on GPU VRAM resources, putting it out of reach for many potential users; the routine was also found by some as too complicated to reproduce;
- the adding of fine subtle detail featured by the method relied in great deal on the inpaint_global_harmonious preprocessor implemented fully only for SD 1.5 in Automatic1111 webui; similarly, for Tile Colorfix Controlnet (available also in Forge / SDXL, but that’s it); as of today, this is still the case;
- the LCM sampler that the method also relied on, while efficient in adding of fine detail, is prone to significant reddish color cast difficult to eliminate even with Tile Colorfix (and it’s quite noticeable in the enhanced image); nowadays, this sampler is being superseded by the Hyper family of samplers which doesn’t have this drawback;
- to enhance the only realistic test image featured in the article, the author used, as an integral part of the routine, the 4xFFHQDAT upscale model known to be one of the best for improving faces and skin. That obscured the actual capabilities of SILIVI v2 as an image enhancement method;
- upon closer inspection, the face skin texture in the enhanced image doesn’t appear entirely natural to me (especially on the forehead), despite the striking level of detail; also, the enhanced face’s features deviated a little too much from the original toward perfection;
- the prompt used for the test, “a woman with dark hair and a red top is posing for a picture at the event” doesn’t strike me as useful at all; in fact, it invites all kinds of color casts and other unwanted effects by the checkpoint (but that might be the least of the issues).
Now that, a year later, Automatic1111’s development has ceased altogether, and Forge’s one seems to be drawing to its end too, mired in a perpetual experimental phase as it is, these SD webui tools appear to hit a dead end. The only viable open-source, local-generation alternative to implement professional-grade image upscaling and refinement that remains is ComfyUI, its workflows and frontends that use it, such as Krita AI. This study is my best effort to improve on SILVI on the new platform, using some of the method’s basic ideas but avoiding its major drawbacks.
AI-assisted image enhancing: the bare bones approach
The single most efficient trick to be used when enhancing or recovering a poorly looking image is to increase its resolution before processing, usually by 1.5x – 2x. (In fact, most online image enhancing platforms will only do that through doubling the resolution.) The intermediate 1600×1600 size for our test image is still not that large to be regarded as hires and so can be easily processed by most GPUs.
The resolution increase is usually done with a suitable AI upscale model that would do the best job of recovering and keeping image detail sharp right during the upscale step, typically in facial features (if it’s a photo restoration project). It’s a useful shortcut, but in this particular case study, I wanted to minimize the number of AI components involved, so I used instead non-AI methods available in every image editing tool, like the classical Lanczos or even Nearest Neighbor. The Lanczos, when combined with subsequent unsharp-masking, proved to work just as fine for the task – even with the enlarge factor as high as 3x (see the ‘grotesque’ 2400 x 2400 case at the bottom).
Of equally high importance is to choose a good photorealistic AI model (a checkpoint) and a sampler that will accomplish the refinement task with maximum subtlety and precision, and preferably in a reasonably short computational time. This is a question of seeking what works the best for the image at hand, and the number of combinations is virtually endless with Stable Diffusion. We, however, will restrict our choices here to the SDXL family, the one I have the most experience with, skipping SD 1.5 altogether and leaving Flux for another time perhaps.
Next, the Tile Resample Controlnet is typically added to the process to guide generation with the AI checkpoint model, preventing the latter from straying too much from the original pixel content. So the other important trick is to find the sweet spot, a combination of the denoise factor for the img2img refinement and the Tile Resample strength that works the best for the image of the given resolution, so that the picture won’t get modified to the point of the person’s visual identity being altered, yet will acquire some realistic detail, leveraging the checkpoint’s trained data. This is always a matter of extensive trial and error, no universal formula exists.
A detail LoRa (a specialized extension of the model) can be added to the process, and it’s a popular choice as well. But again, for purposes of this case study, I avoided involving any LoRas of the kind. (They can also be costly in terms of VRAM used, and often may add artefacts of their own.) The only exception I made was for the Hyper and LCM LoRas, to enable the respective samplers that are great for image enhancing: they are both fast (10-12 steps max), while doing a high quality job.
No IP Adapter was used in this case study either. The hallucinations that this component was meant to prevent under high denoise values in SILVI / SD 1.5 didn’t occur during image enhancement with Krita AI / Comfy / SDXL, and in general, I didn’t find it very useful for the purposes of this project.
And finally, in the cases when the image resolution is substantially high (equal or above 2K), a tiled upscale method such as Ultimate SD Upscale or Tiled Diffusion is typically used, to avoid running out of the GPU VRAM memory. For the image of 1600×1600 resolution like we have here, this won’t be strictly necessary, however.
The methods I used
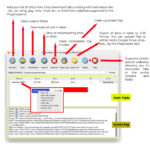
To enhance the test image with Krita AI and achieve a result comparable to Veruky’s, I followed the basics of the SILVI method, using equivalent SDXL / Comfy components and advanced options of the plugin operating within a Photoshop-like host. The original 800×800 image was 2x resized in Krita with Lanczos and unsharp-masked before processing, and then refined in the img2img mode. The best result was achieved, as seen in the screenshots of Krita AI UI below, with the dreamshaperXL_lightningDPMSDE checkpoint, engaged in img2img (Refine) generation at 0.83 denoise (83% refine strength, in Krita AI terms) and the CFG of 1.5, coupled with the LCM sampler / uniform scheduler at 12 steps enabled by the lcm-lora-sdxl LoRa at 0.30 strength. The Tile Resample (Unblur, in Krita AI terms) model was xinsirtile-sdxl-1.0 engaged at 0.56 strength. No prompt was used to refine the image, which is my usual practice in such a project. Generation took 13 seconds to complete (*).


The resulting image can be viewed among others in the comparison matrix below. (Note: color-wise, the version on the screenshot may appear different from the way the generated image looks on a non-HDR screen.) The workflow generated by the plugin for the resulting image, as well as the metadata can be found with test images in the google folder here. It needs to be mentioned that, to leverage the advanced options available in Krita, I used the Luminosity layer blending mode to fix the color cast typically introduced by the LCM sampler when used at a high denoise value / refine strength (that was the purpose of including the Tile Colorfix Controlnet in SILVI v2, at which it was only partially successful).
The proposed hereby routine (see at the bottom) is flexible, since it doesn’t rely on any particular AI upscale model or a Controlnet preprocessor or an IP adapter’s use, allowing one to choose from a wide variety of SDXL Lightning checkpoints and experiment with a range of denoise and Tile Resample strength values for various types of images. (If one wants to allow AI a bit of creative hallucination, it can be easily done via raising the denoise value and/ lowering the controlnet strength or its range end value, combined with a suitable prompt.) Thanks to the Lightning or Hyper mode, the process is also remarkably fast and not too VRAM-consuming.
For enhancement with the HR Beautify workflow, the LCM sampler was replaced with the Hyper one (Euler a / normal, to be precise) at 10 steps and CFG 3.0, and the dreamshaper checkpoint replaced by realvisxlV50_v50LightningBakedvae (not a critical choice). Also, Tiled Diffusion with the Mixture of Diffusers method utilizing an alternative denoise algorithm, coupled with Tiled VAE Encode & Decode was used for processing, with default tile configuration parameters. The denoise value was 1.0 this time, and Tile Resample Controlnet strength was at 0.55, using the same xinsir model. Finally, a custom node that emulates Krita’s Luminosity layer blending mode effect was used for color-fixing. Here too, the processing time of 17 seconds was comparatively fast, owing to the Hyper mode. The resulting image generated by the workflow is also included in the comparison matrix.
The workflow approach is in a number of ways similar to the one I used in Krita AI, but the difference in the components and the strikingly different result don’t really allow it to be called a modification of the SILVI method anymore, it’s more like an evolution. In general, I find both results, by Krita AI and HR Beautify, remarkable in their own way and worth all the effort – although they did require months of experimentation (in parallel with refining other types of imagery), starting with Forge back in early 2024), before I could arrive at them.
The upscale tool comparison matrix
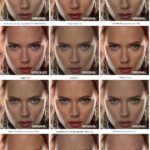
Below follows the matrix of image versions produced by all locally generating SD tools I was able to try (with titles in blue), combined with the results by commercial platforms, tools and methods specializing in AI image upscaling and enhancement (with titles in black). The images included in it and displayed in no particular order are results of my honest effort to achieve the best output from each tool or method. I also clocked the time in seconds it took to process the image, it’s indicated in parentheses next to the tool’s title.

(Use this link to view the matrix png in its intended size and quality. The images themselves, in 2 resolutions, are in this folder).
Generation parameters used to produce these images were as follows:
Krita AI Flux Dev: refine at 92% strength, Euler simple sampler, Flux Upscaler 1.0 control layer
CCSR: default parameters on replicate.com
Clarity Upscaler on replicate.com: UltraSharp upscale model, juggernaur_reborn checkpoint (SD 1.5), dpm++ 2m karras sampler/scheduler, dynamic HDR 6, creativity 0.3, resemblance 3, tiling 192×192
SILVI v2 by Veruky: described in the CivitAI article
Forge webui: 4xFFHQDAT upscale model, RealVisXL_V4.0 checkpoint, denoise 1.0, Euler a Hyper sampler via Hyper-SDXL-8steps-CFG-lora and normal scheduler with 8 steps and CFG 1.0, ttplanetSDXL Controlnet Tile Resample model at 0.8 strength, colorfix
SUPIR-v0Q: default parameters on replicate.com
Magnific.ai: scale 2x, optimized for Portraits (Hard), Creativity -4, HDR 2, Resemblance 10, Fractality -4, Engine Auto (any other combination of parameters resulted in an even worse picture)
Krita AI: described in the previous section
Topaz Generative (via Krea AI): Sharpness 50%, Denoise 42%, Detail 50%, Creativity 2, Texture 3, Face Enhancement On or Off didn’t result in any discernible difference; (any other combination of parameters resulted in more artefacts)
Leonardo.ai Universal Upscaler Ultra: style Realistic, strength Mid
HR Beautify workflow: described in the previous section
Just two observations of the results of this comparative test:
1. Some of the most impressive refinements have been produced by methods and tools that took a longer than a half minute processing time (SUPIR, Topaz Generative), and some even longer than a minute (CCSR and Flux Dev / Flux Upscaler under Krita AI), still ending up with various small glitches in the output image. Given the rather low 1.5K resolution of the test image, I cannot consider these solutions practical, as further doubling of the resolution will make the times prohibitive or costs unaffordable. With SUPIR in particular, processing of resolutions near and above 2K remains out of reach for those of us with consumer-grade GPU equipment, due to the excessive amounts of VRAM this method requires.
2. Because of the reddish color cast stemming from the test picture (the ‘original’) and dominating most of the images in the matrix, the results by Krita AI and Forge may appear colorless or dull in comparison. To do justice to them, they should be viewed solo or against the test image only.
Pushing the limits: the grotesquely degraded test picture
Wait, we are not done with this image yet! To further prove one of the main points of my case study (that, to enhance a picture of degraded quality, you don’t need a specialized AI upscale model, a standard resizing method will do), I wanted something really exaggerated as the input and so decided to enlarge the test image even more before enhancing, to its 3x size. What’s more, to keep the detail sharp, I did that not with the intelligent Lanczos, but with the simplest of them all, the Nearest Neighbor method, and then unsharp-masked the enlarged version too, for good measure. The resulting 2400 x 2400 picture looks truly horrendous, doesn’t it?

Well, refining this mess of an image surely posed a bigger challenge for the methods I used for the 1600×1600 one. To make a long story short, here are the best results by the 3 tools I tried, in chronological order of their production, saved in the jpeg format with 98% quality:

With Forge webui, the result by which is pictured above, I could succeed only via using a 2-pass enhancement. By which I mean running an enhancement with one checkpoint and sampler combo, then using their output as the input for a secondary run, where another checkpoint + sampler combo was used. A single pass would not produce a skin or other facial features looking refined enough or entirely natural. (This is not to say though that the displayed above image is perfect in every respect; you might find for instance that the original has been refined a little too far here, the pleasant eyelashes and eyebrows in particular).
The 1st pass used the icbinpXL_v6 checkpoint at 0.45 denoising strength and the CFG scale of 1, with the classical DPM++ 2M / Karras sampler-scheduler at 23 steps. The Tile Resample model used was xinsirtile-sdxl-1.0 engaged at 0.60 weight. For hires processing at 2.4 x 2.4K, Forge’s SD upscale tiled mode was used at 1x upscale and an overlap of 96 pixels. No prompt was used. Processing time was 24 seconds.
The 2nd pass used albedobaseXL_v21 as checkpoint at 0.60 denoise strength and the CFG scale of 2, with the DPM++ SDE / Karras sampler-scheduler at 25 steps. The Tile Resample model used was again xinsirtile-sdxl-1.0, engaged at 0.60 weight. The tiled img2img parameters were the same as at the 1st pass. The prompt was “detailed photograph of a female face with fine skin” (seemed a good idea at the time). Processing time was 1 m. 37 s. – a bit too long, if you ask me.
The images generated with Forge, in their full png quality and size, are found in this folder, along with the metadata of the generation parameters used.

Fast forward half a year, I no longer use Forge. The HR Beautify Comfy workflow, whose result image is displayed above, required (in the end) only one pass to generate a satisfying output. This was achieved with the dreamshaperXL_lightningDPMSDE checkpoint at 1.0 denoise and the CFG of 1.5, using the LCM sampler with the Karras scheduler at 12 steps, controlled by the lcm-lora-sdxl LoRa at 0.60 strength. Tiled Diffusion with the Mixture of Diffusers method, coupled with Tiled VAE Encode & Decode nodes, was used for tiled processing, with 1200×1200 tile size and other tile configuration parameters at the default. The Tile Resample Controlnet model used was xinsir at 0.60 weight. The prompt was “detailed 8k wallpaper” (which could be left blank to the same effect). Finally, a custom node that emulates Krita’s Luminosity layer blending mode effect was used for color-fixing. Processing time was 63 seconds.
The png image generated by HR Beautify is found here, with the Feb. 2025 version of the workflow embedded.

Displayed above is the best single-pass result by Krita AI. This time, I used the Upscale & Refine (hires img2img) mode of the plugin, with the upscale factor of 1x. This plugin’s feature uses a built-in, proprietary tiled refine logic and is blazingly fast (which is very appreciated when working with the 2.4K resolution), offering the most elegant interface I have ever seen among SD tools. Finding an efficient parameter combination still required some effort, however. (My goal was also to avoid using the LCM sampler with its malign reddish color cast and move on to the Hyper one.) These are the parameters I eventually worked out (see the screenshot below):
icbinpXL_v6 checkpoint at 0.50 denoise (50% refine strength) and the CFG of 3.0, coupled with the Euler a sampler / normal scheduler at 12 steps, enabled by the Hyper-SDXL-12steps-CFG-lora LoRa at 0.55 strength; Tile Resample (Image guidance, in this mode of the plugin) strength 70%, using the xinsir model; tile overlap set at the maximum of 128 pixels, to avoid any visible tile seams (which otherwise would plague the output of Upscale / Refine at this denoise level); no prompt. Processing took 39 seconds to complete. (*)

The images generated with Krita AI, in their full png quality and size, are found in this folder, along with the generated by the plugin Comfy workflow.
The proposed upscale & refinement routine, in 7 basic steps
(applies to both Krita AI and the HR Beautify workflow that you may want to adapt to your needs; in the latter case steps are nodes)
1. Resize the source image up with the factor of 1.5x or 2x max using the Lanczos method and apply a sharpening filter to the result (available in every image editor). Alternatively, use your preferred / specialized AI upscale model such as foolhardy Remacri or 4xFFHQDAT. This step is not needed if the image is already large enough (at 1.5K or larger) – unless you perform a progressive upscale of course (see 7. below).
2. Select a photorealistic Lightning checkpoint like Dreamshaper, Juggernaut or RealVisXL, and an LCM or Hyper sampler with 10-12 steps. Alternatively, select a regular non-Lightning photorealistic checkpoint from the above variety or any other like icbinpXL that excels at photorealism, and use a corresponding LCM or Hyper LoRa. During generation, use a high refine strength at or above 45% (denoise value at or above 0.45) and a low CFG between 1.0 and 3.0.
3. For images at and above 2K resolution, choose a tiled refine (img2img) component such as Upscale Refine (in the workflow, use Tiled Diffusion coupled with Tiled VAE Encode & Decode).
4. Add an Unblur control layer (Controlnet Tile Resample) with the strength/weight within the range 0.50-0.70 (50%-70% image guidance). A good choice for SDXL is the xinsir model.
5. Generate.
6. When using an LCM sampler, apply color-fixing to the generated result via using Luminosity layer blending mode (or an equivalent node in the workflow). For either sampler, you may also want to adjust the result’s saturation and/or increase the HDR range.
7. Experiment with the refine strength (denoise value) and the strength (weight) of the Unblur control layer (Tile Resample Controlnet), adjusting each interchangeably, until you achieve desired refinement effect. The refine strength can be as high as 100% (denoise value at 1.0). Lower the denoise value and/or raise the tile resample weight to keep the output closer to the input, and raise denoise and/or lower the tile resample weight, to allow for more checkpoint creativity and added detail. When using a sampler LoRa, adjust its strength, if it gives strange artifacts, glitches or blurriness. Experiment with the scheduler coupled with the sampler, its choice can have a significant effect on the output. Experiment with the CFG too, but avoid values from 3.0 and up, since they can introduce a color cast or artefacts. Experiment with the tile size as well, it can greatly influence the output quality.
8. For progressive upscale, repeat steps 1.-7., varying the checkpoint and adjusting all parameters at play anew: every resolution requires finding a different optimal configuration of them.
Conclusion (sort of)
In the course of this year-long study, I have observed many times that using a Hyper sampler, whether natively with a Lightning model or enabled by a Hyper Lora, doesn’t introduce much of the infamous red color cast, so characteristic of the LCM sampler at high denoise values. While the LCM sampler still remains superior at adding fine detail to the generated output, the Hyper keeps proving very competitive, both in terms of quality of the img2img enhancement and in the processing speed. (It can be used to generate very appealing output from scratch as well, but that is not the subject here.) Concluding this study, I would like to suggest that the (relatively) new line of Hyper models and samplers should be used much wider than it is done now. The older sampler favorites such as DPM++ 2M SDE no longer seem to me the best choice, when it comes to advanced image refinement of large image volumes.
(*) Krita AI, HR Beautify workflow and Forge webui images were generated on a Windows 11 PC equipped with 2.50 GHz Intel Core 9 185H chip and 32 GB RAM, using SSD storage. The GPU was an NVIDIA GeForce RTX 4070 Ti SUPER with 16 GB VRAM, operated by the Comfy server v0.3.19. No TeaCache or any other accelerator extension has been used.


Leave a reply